Using the Control Panel
To open the TaskMenuBar control panel, choose "TaskMenuBar"
from the "Control Panels" folder in the Apple menu.
Click here
to see the entire control panel with the default settings
in a separate window.

At the top of the control panel, you will see the on and off buttons,
the "Register..." button and the "Home Page..." button which will
take you to the TaskMenuBar home page in your default Web browser.
Setting Options
There are various options in the left half of the control panel
as shown on the right.
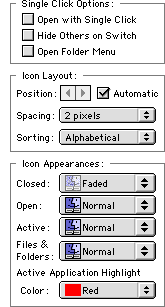
Single Click Options:
- Check "Open with Single Click" to open or launch an item by a single click.
- Check "Hide Others on Switch" to automatically hide other applications
when selecting the active application.
If this option is selected, an option click will not hide other application.
- Check "Open Folder Menu" to open the drop down menu for a folder immediately
without holding down the mouse or the control key.
Icon Layout:
- Uncheck "Automatic", if you like to display the icons at a fixed position
regardless of the width of the menu bar clock or the application menu.
Then adjust the icon position using the "arrows" next to the check box.
NOTE: Some appearance themes and Kaleidoscope schemes may
require unchecking this "Automatic" check box to make the icons displayed.
- If you feel the icons are too close to each other, change the spacing
using the "Spacing" pop-up menu.
- To change the sorting order of the application icons,
use the "Sorting" pop-up menu.
There are four options, namely "Alphabetical", "Reverse Alphabetical",
"Launch Time" and "Reverse Launch Time".
This sorting order only affects to non-resident applications
(i.e. ones on the left side of the separator).
 Icon Appearances:
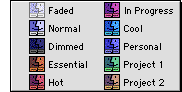
- You can choose the icon appearances for closed (not running),
open (running) and active (front) applications,
and all other files and folders from the options shown on the right
using the four pop-up menus.
NOTE: Although you can change the colors from "Essential" to "Project 2"
in the Finder's preference window, the change will not be shown in the pop-up menus.
- You can also choose the highlighting color to frame the active application
using the "Active Application Highlight Color" pop-up menu. You can use one of the six
pre-defined colors, a custom color ("Other...") or nothing at all.
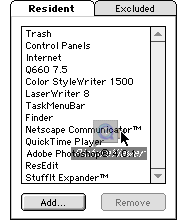
Adding, Sorting and Deleting Resident Items
To add items that always stay on the menu bar,
open the control panel, and drag and drop the items or their aliases.
The items will be added to the menu bar and to the list in the "Resident" tab panel.
In the picture on the right, PictureViewer is being added.
Alternatively, you can click the "Add..." button and use the open file dialog.
However, the open file dialog cannot be used to add folders,
desktop printers or the trash.
To sort the items, drag them on the list.
To delete items, choose them on the list, then click the "Remove" button.
TIP: To add an application currently running,
choose "Show Original" from its drop down menu and drag and drop it onto the control panel.
Another good place to find applications is the "Recent Applications" folder in the Apple menu.
NOTE: You can unmount the volume on which the file or folder resides after adding it to the menu bar.
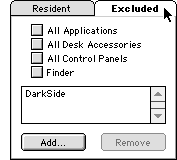
Excluding Particular Applications from the Menu Bar
You may wish not to display particular applications, such as screen savers,
even if they are running.
To do this, open the control panel and click the "Excluded" tab
as shown on the right.
Then add applications to exclude just like adding resident items.
In the example on the right, a screen saver "DarkSide" is listed as an excluded application.
Or, you can exclude a particular type of applications.
For example, to exclude all control panels, check the "All Control Panels" check box.
NOTE: "Application signatures" are used to identify excluded applications.
For example, adding SimpleText, which you are likely to have more than one copy,
to the list excludes all SimpleText applications from being displayed.
NOTE: The "Quit Others" and "Quit All" commands
will not quit the individually excluded applications (DarkSide in this example)
because they are likely to be background applications.